After I set up my blog with GitHub Pages it became obvious that one major feature is missing: a comment area. I did some research, and it seems that disqus is the major player in that regard. As I don’t want to spend money for that I dug further and found Staticman which is an awesome solution to enable static webpages to include some user-generated content. A simple use case for that kind of solution could be a comment area.
Staticman itself states that it can easily be deployed to Herokus free tier and provides documentation for its configuration values but unfortunately does not include a detailed plan how to set up the Heroku-based hosting for it.
Heroku Setup
The Staticman team is so kind to provide a button to deploy to Heroku in itsGithub ReadMe.
Enter an App Name and chose a region and click on Deploy App. Afterwards, Heroku does the first deployment. When it finishes, open your new app. Now follows the customization of the newly deployed instance.
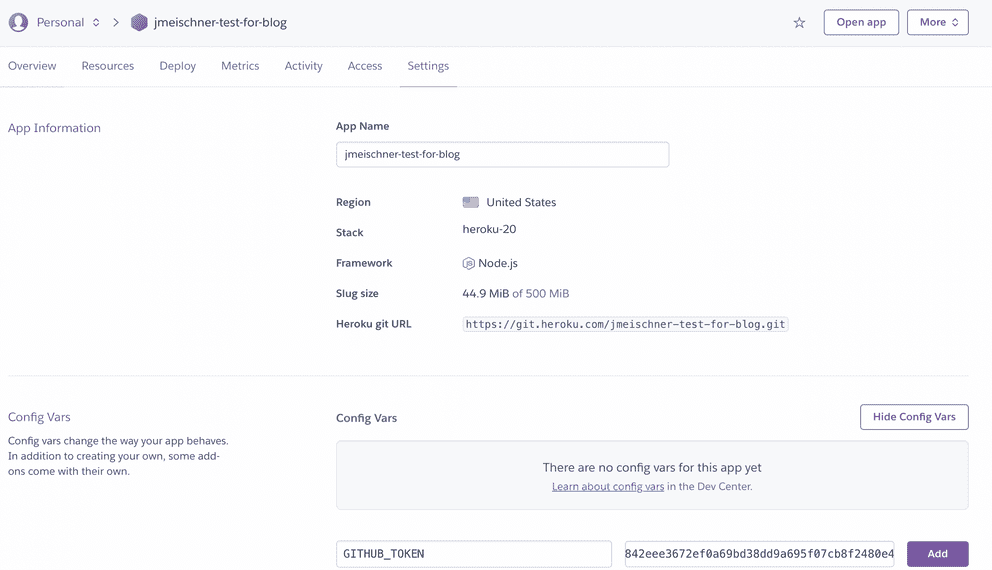
To allow Staticman to create a Merge Request in your GitHub Repository you need to provide a personal access token to it. You can create one in your personal GitHub Settings > Developer Settings > Personal access tokens. Create a new one and select the repo and user scopes and click on Generate Token. Copy it and go back to your Heroku App Settings > Config Vars and add GITHUB_TOKEN with the value you just copied, so that it looks similar to this:

The second thing you need is an RSA Key. You can easily generate one in your terminal via:
> openssl genrsaAnd copy everything starting with -----BEGIN RSA PRIVATE KEY----- and including the -----END RSA PRIVATE KEY----- to your clipboard. Create a new Config Var in your Heroku app and call it RSA_PRIVATE_KEY and use the copied RSA Key as value.
After this is done everything should work, and you should see a success message when open the app in your browser

Gatsby
To do the configuration for your blog it is necessary to have a staticman.yml at the root of your repository. I started with the sample from the Staticman repository and adjusted it accordingly to the documentation. In contrast to the sample I added the slug — my identifier of the current blog post — to the fields array, instead of the options array and put all my comments in one single comment directory via the configuration, to make it easier for Gatsby to query them.
path: "_data/comments"So let’s add new comments to our blog post. It’s as simple as creating a small form and post the fields to the Staticman API.
<form method="POST" action="https://{YOUR HEORKU APP NAME}.herokuapp.com/v2/entry/{GITHUB USERNAME}/{GITHUB REPOSITORY}/{BRANCH}}">
	<CommentForm direction="column">
    <input name="options[redirect]" type="hidden" value={"https://{YOUR-DOMAIN}/" + slug + "?commentAdded=1"} />
    <input name="fields[slug]" type="hidden" value={ slug } />
    <Input placeholder="Name" name="fields[name]" type="text" /><br />
    <Textarea placeholder="Comment" name="fields[message]"></Textarea><br />

    <PrimaryButton type="submit">Add Comment</PrimaryButton>
  </CommentForm>
</form>
Textarea, Input, PrimaryButton and CommentForm are styled components.
The redirect field is used by Gatsby to redirect the user back to your page after the comment was added. I additionally added a query parameter to it, to display a “Thank You” toaster after the successful submit.
The last step is to display the list of comments for the current blog post. Therefore, I added the gatsby-transformer-yaml plugin to the gatsby-config.js including the filesystem configuration:
{
  resolve: 'gatsby-source-filesystem',
  options: {
    path: `${__dirname}/_data/comments`,
    name: 'comments',
  },
}
and an allCommentsYaml section to the blogPost template query:
query($slug: String!) {
  markdownRemark(frontmatter: { slug: { eq: $slug } }) {
    html
    frontmatter {
      title,
      slug
    }
  }
  allCommentsYaml (
    sort: {fields: date, order: ASC},
    filter: { slug: { eq: $slug } }
  ) {
    edges {
      node {
        _id
        name
        message
        date
      }
    }
  }
}
In that way we get all our comments via const comments = data.allCommentsYaml.edges into our blogPost component. I created a list of comments via:
const list = comments.map(c => (
  <Comment comment={c.node} />
))
Where my Comment component looks as easy as this:
const date = new Date(comment.date * 1000).toLocaleDateString();
return (
    <Comment align="center" direction="column">
        <Message>{comment.message}</Message>
        <CommentFooter justifyContent="space-between" direction="row">
            <Author>{comment.name}</Author>
            <DateElement>{date}</DateElement>
        </CommentFooter>
    </Comment>
)
As Staticman creates a PR for every of your comments, there is also a new branch for every new comment. Fortunately, Staticman cares about that issue and states:
To avoid inactive branches from piling up, Staticman can automatically delete these branches for you after a PR has been merged or closed
They added a web hook endpoint to delete these branches which can be configured as described in their documentation.
Thank you for your time.
Link Collection
- Staticman and its GitHub Page
- Heroku